Internal Linker Manual
What is JO Internal Linker
JetOctopus Internal Linker is built to create an additional internal linking layer for large websites, addressing gaps in existing link structures. It identifies weak points by analyzing crawl budget, keyword data, and page performance from GSC, then generates the internal links needed to strengthen those areas.
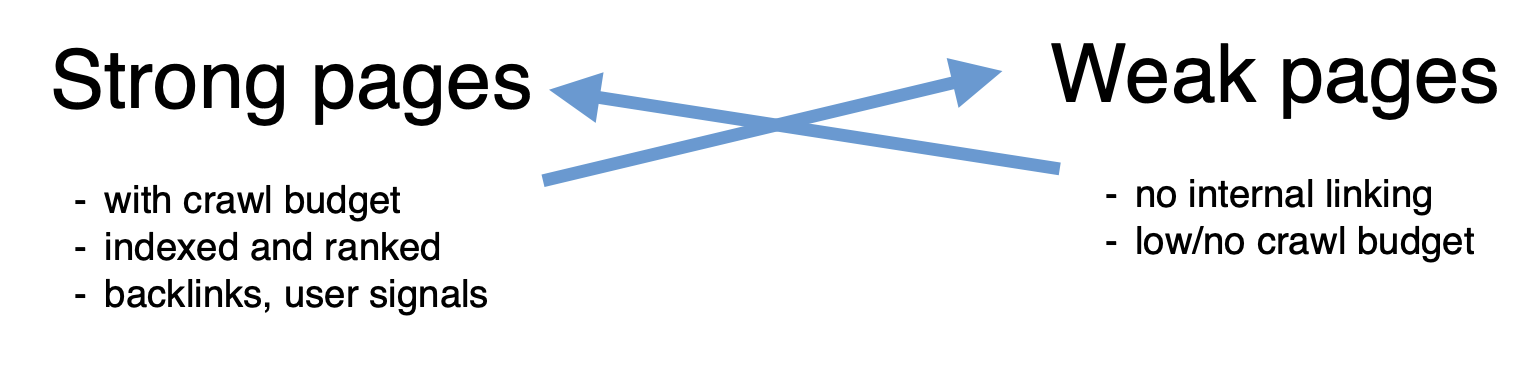
The core concept is donor and acceptor pages. Donors are strong pages with traffic and crawl budget, passing their authority to weaker acceptor pages that need a boost.
JetOctopus Internal Linker is built on a semantic approach, creating internal links between topically related pages. This ensures links are meaningful not just for search engines, but also valuable for users.
The generated schema provides a set of links for each donor page, directing to relevant acceptor pages. JetOctopus Internal Linker doesn’t insert links into existing text. Instead, it follows a block-based approach, which is more effective for large catalog websites like e-commerce, classifieds, and similar platforms.
Best Fit for Website Types
JetOctopus Internal Linker is ideal for catalog-style websites such as e-commerce, classifieds, real estate, automotive, and hotel listings. It’s most effective for sites with at least 10,000 pages.
How to start
Internal linking can seem complex, and it is. But at its core, it’s about analyzing the website structure, internal linking, and applying the proper page categorization.
When optimizing internal linking on large websites, the goal isn’t to fix everything at once. A more effective approach is to work section by section, focusing on specific areas for improvement and iterating as you go.
Step 0: What do we want to achieve
A key point before any technical SEO task is defining the goals.
What do we want to achieve – crawl budget increase? Put more pages into Google’s Index? Boost high-traffic pages by linking them from the whole website?
Defining this upfront guides the entire strategy.
Step 1: The initial crawl
To begin working on internal linking, a site crawl is required. Ideally, a full crawl helps to understand the website’s structure, existing internal links, and weak areas. For very large sites (over 5 million pages), a partial crawl can be a starting point.
Before launching the crawl, it’s important to plan for categorization and filtering. Can we isolate key sections using the URL structure? Do we need custom extractions for fields like brand, product availability, or other useful attributes?
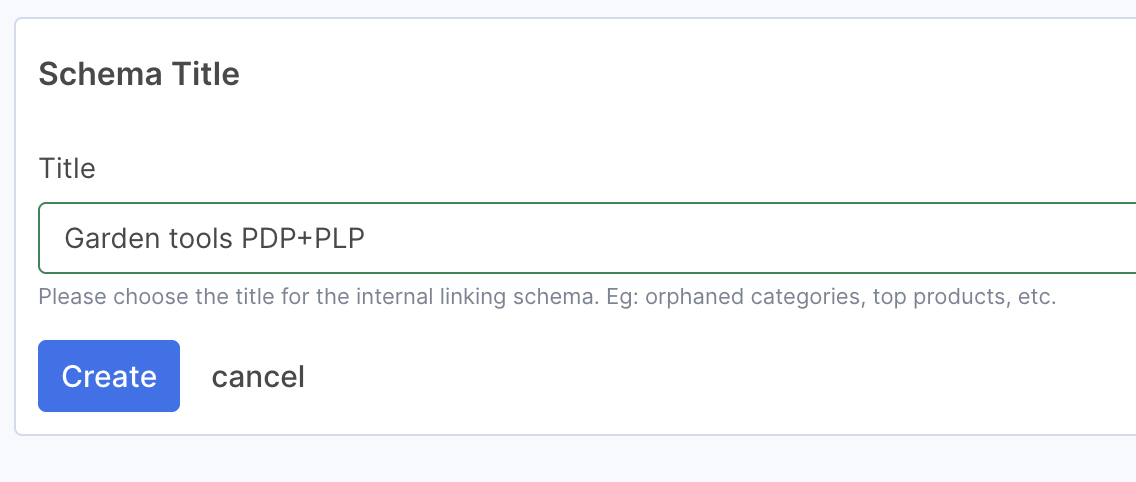
Step 2: Creating a schema
Just like a ship, every new internal linking schema needs a name. Defining it is the first step in the process.
Schema Strategy
The schema strategy sets the direction for the entire process, which is why it’s the first block on the configuration page.
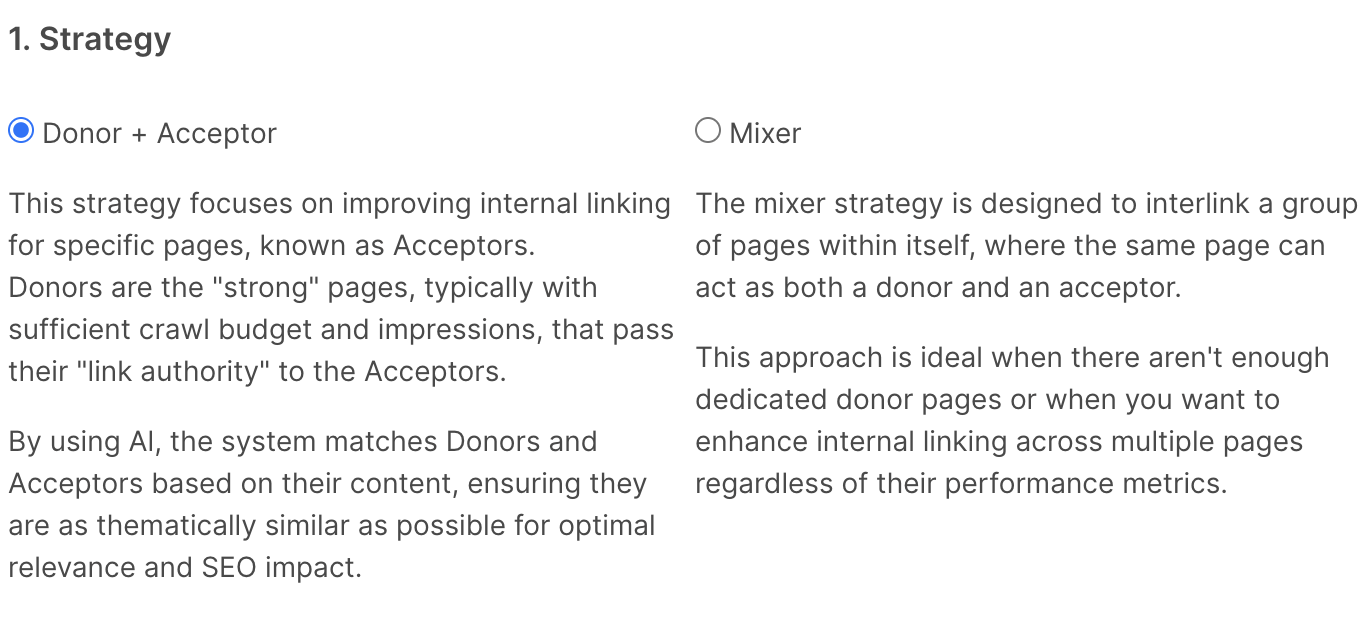
1/ Donor + acceptor
This strategy is ideal when you have two distinct sets of pages – typically, donors are strong pages (with crawl budget, traffic, links), and acceptors are weaker pages you want to improve. However, the opposite can also apply: acceptors might already perform well in SERPs, and new internal links will be used to give them an extra boost.
In all cases, acceptor pages must be open for indexation, while donor pages may not be. If a page’s indexation status changes based on factors like product availability or item count in a category, it can still be used as a donor, since it may become indexable again later.
2/ Mixer
When it’s difficult to separate pages into clear donor and acceptor groups, and your goal is simply to interlink a group of pages among themselves, this strategy is the right fit. It works well for improving overall connectivity without relying on performance-based segmentation.
Step 3: Selecting donors and acceptors
In the crawl list, you need to select your recent full crawl. By clicking ‘Select’, the data table will be shown with all available filters.
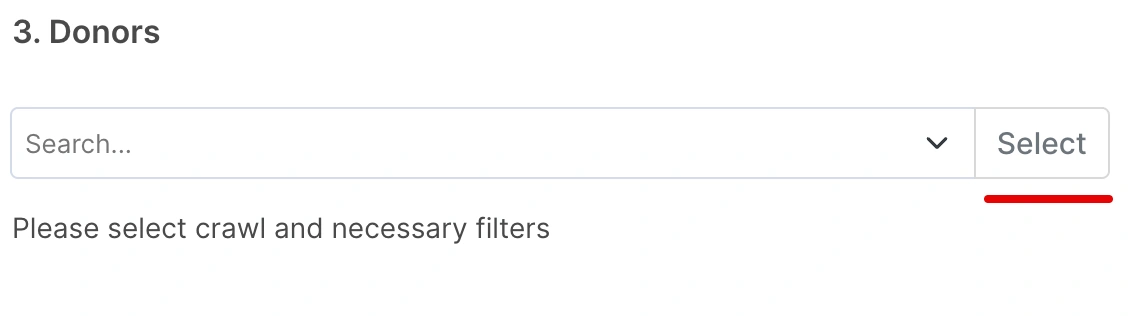
At this step, you’ll add filters to narrow down the selection of pages from the entire website.
For acceptors, start with the “Is Indexable” filter set to Yes.
Next, apply URL-based, any additional attributes (custom extraction) filters to focus on specific categories or site sections.
Be sure to exclude paginated pages from the acceptor list – if they appear in the crawl, they usually don’t need additional internal linking.
The same applies also to comments and review pages if they have a separate URL from the product page.
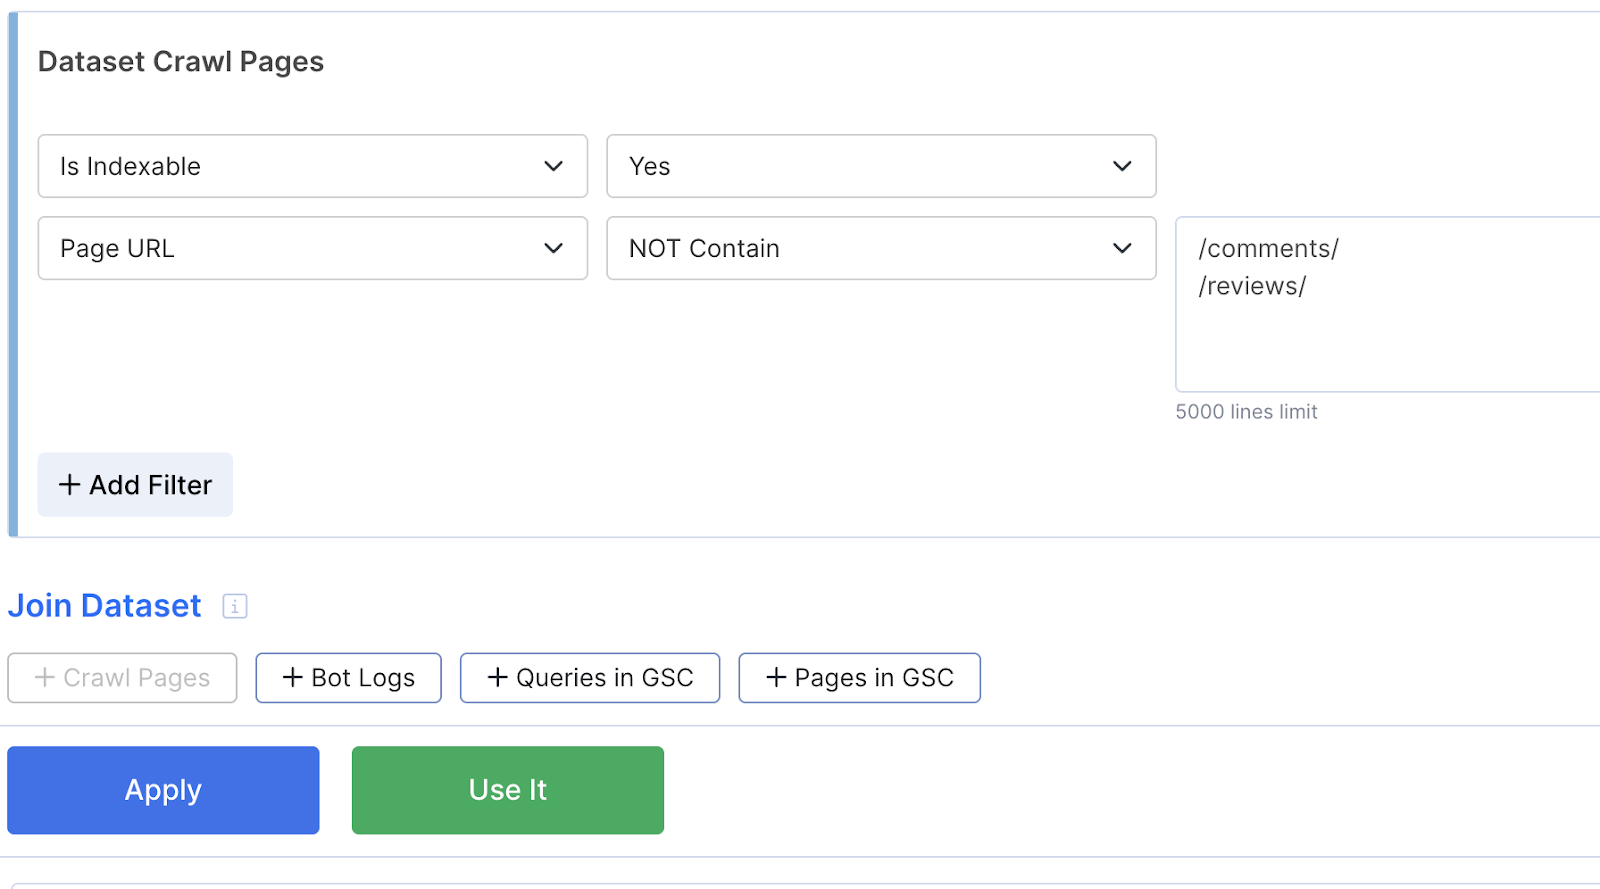
After ensuring the list of pages in the data table looks good, click ‘Use it’.
Step 4: Starting AI Crawl
As mentioned earlier, page semantics play a crucial role in internal linking. Linking unrelated pages, like garden tools to mobile phones, offers no value to users or search engines.
With AI Text Embeddings, we can achieve a much higher level of semantic accuracy between pages than was possible just a few years ago.
To optimize cost and processing time, the AI crawl runs only on the selected donor and acceptor pages, rather than the entire website.
Crawl configuration: Set up the crawl as you normally would, choose the number of threads, user agent, etc. There’s no need to apply URL limits at this stage; the system will automatically crawl the list of selected URLs based on your earlier selections.
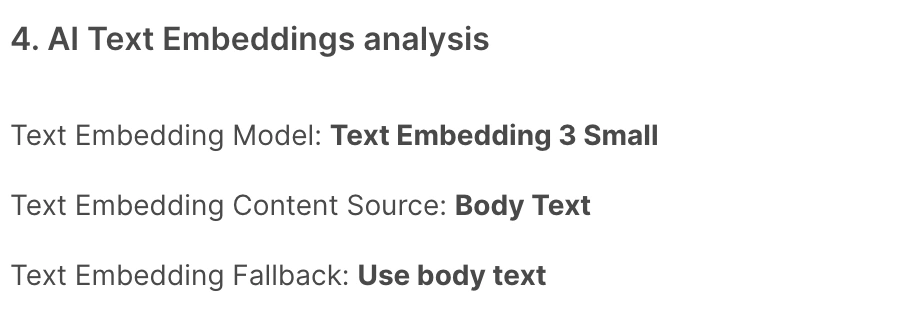
AI Model: In almost all cases, TE 3 Small works well. Using a Big model can make sense for non-English languages, and when the Small model gives bad relevance.
Content source: What text to use for AI analysis. By default, the system uses all text on a page, including menus, filters, and footers.
However, on pages with minimal useful content (e.g., a short product description), this extra noise can reduce relevance. In such cases, it’s better to create a custom extraction focused on key content like the product description. This refined input leads to much higher accuracy in AI Text Embeddings analysis.
Fallback: If a custom extraction returns an empty result, the system can either skip the page or default to using the full page content for analysis.
Step 5: Formula configuration
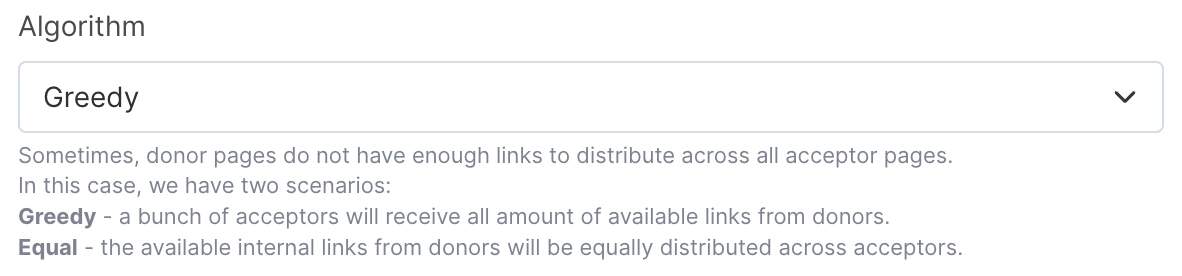
Algorithm: defines the way to distribute available links on donors’ pages.
Sometimes, there are enough relevant donor pages to link all acceptor pages. The algorithm defines the formula behavior:
Greedy – a bunch of acceptors will receive all amount of available links from donors.
Equal – the available internal links from donors will be equally distributed across acceptors.
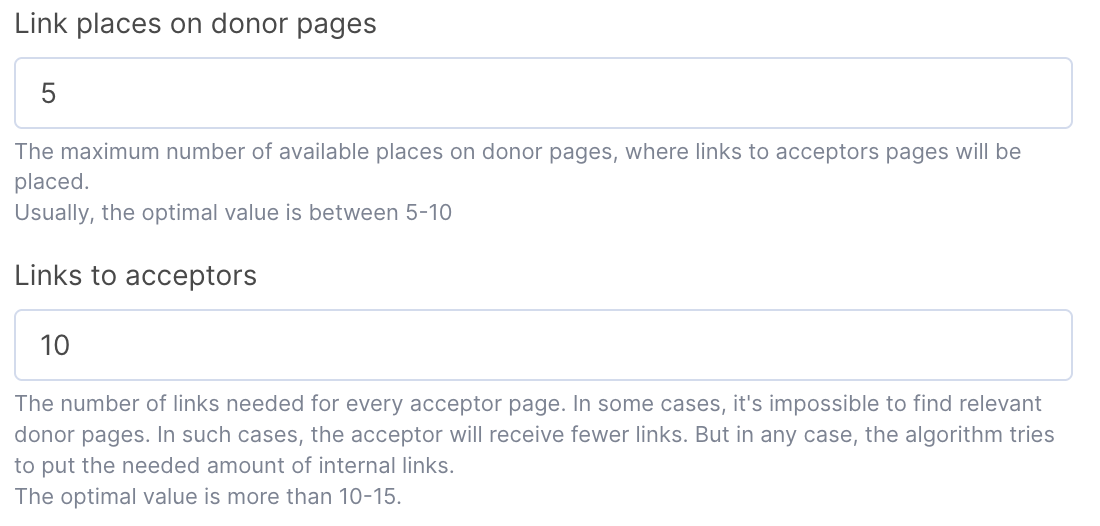
Link places on donor pages: the maximum number of links we can put on each donor page. In most cases, the optimal value is up to 10.
There is no benefit for the user or search engine to have 100 additional internal links on a page.
Links to acceptors: how many links every acceptor needs. Many factors influence this number (existing internal links, how it affects the crawl budget, and many more). Usually, the more is better, but a good starting number is 20.
Step 6: Matching Fields
Matching fields are used to apply the first layer of page categorization before running AI Text Embeddings.
Why not use Text Embeddings directly, as you may have seen in other tools? Because on catalog websites, this often leads to irrelevant linking. By narrowing down the pool with matching fields first, we ensure the AI works only with contextually related pages, making the results far more accurate.

Choosing the right matching fields depends on your website’s type, structure, and available data.
If the breadcrumbs schema is implemented, it’s a great starting point. But in many cases, further categorization is needed.
For example, in automotive catalogs, linking parts from Toyota to BMW is not relevant. In such scenarios, using custom extractions or schema data, like brand or product type, ensures accurate and meaningful link matches.
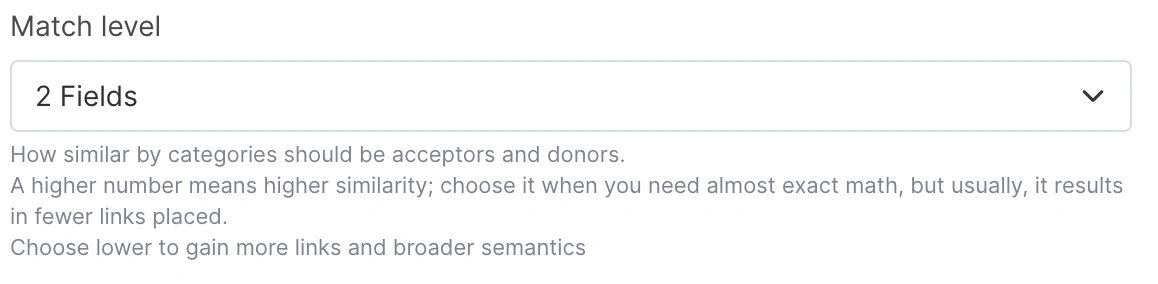
Min fields to match: The formula attempts to use all available matching fields to find the best donor-acceptor pairs. However, when exact matches on all fields aren’t possible, this setting defines the minimum number of fields required for a valid match. The more fields that align between pages, the higher the priority given, ensuring maximum relevance and accuracy in the linking process.
Step 7: AI Similarity
This parameter sets the minimum cosine similarity between the text embeddings of two pages, after applying matching fields.
It controls how closely related the page content should be for a link to be created. You’ll need to test and evaluate the results to find the best setting – typically, values between 0.5 and 0.8 work well.

Step 8: Anchor generation
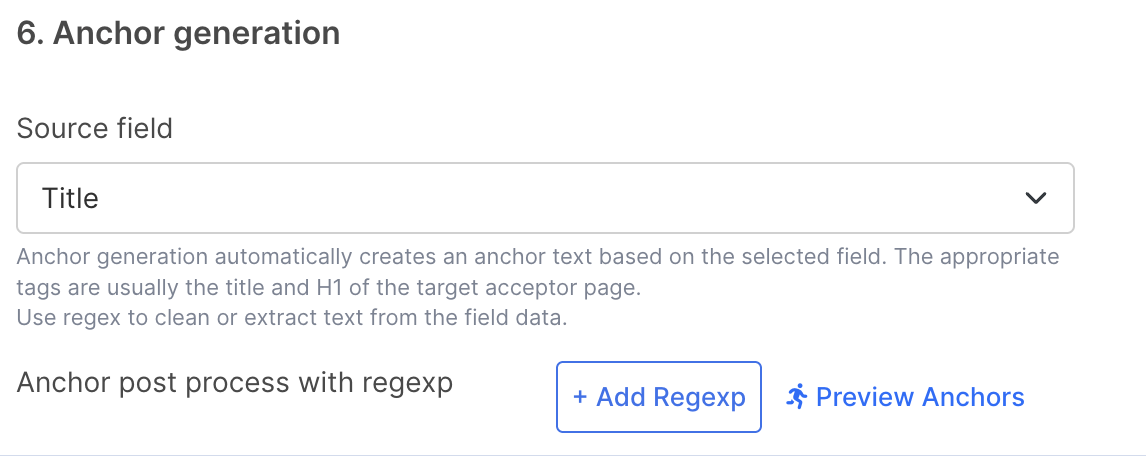
Anchors can be generated using a field from the target acceptor page- typically the title or H1.
To refine the anchor text, you can apply a regexp to remove unnecessary parts, ensuring the final anchor is clean, relevant, and user-friendly.
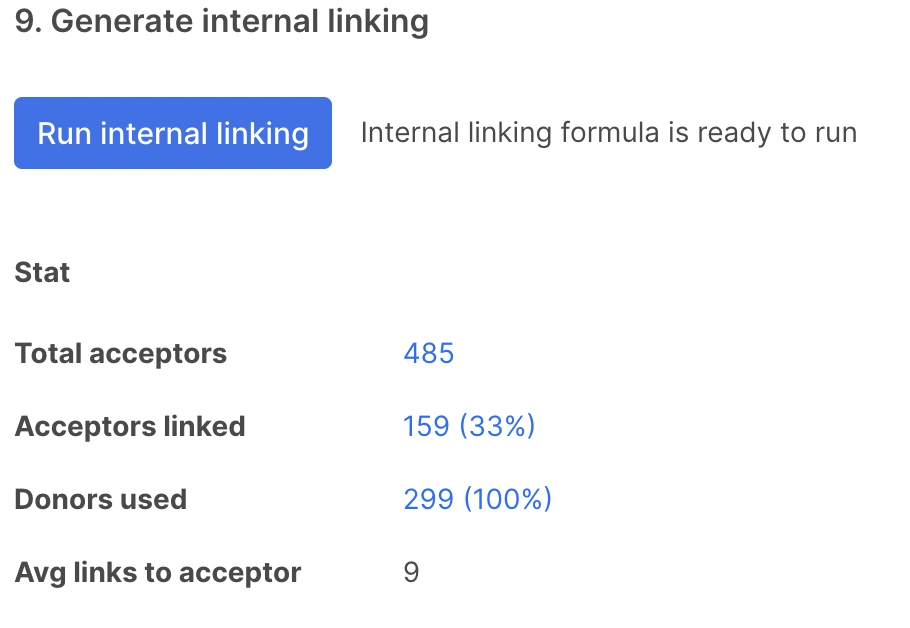
Step 9: Generate internal linking
Once all configurations are set, it’s time to generate the internal linking schema.
Under the hood, the system prepares the data and runs it through the linking algorithm on a separate, quite powerful server.
The process typically takes a few minutes to complete.
Step 10: Assessing the results
1/ Compare the numbers between Total Acceptors and Acceptors Linked.
If the linked percentage is 0%, it usually indicates incorrect or overly strict matching fields.
If the linked percentage is low, there could be a few reasons:
- not enough donor pages
- too many matching fields
- a high AI similarity threshold
Suggestions:
- try lowering the AI similarity threshold by 0.1
- if you set Min Fields to Match at 4- 5, reduce it by 1
2/ Analyzing the relevancy
Open the preview of the results – available in donor view, acceptor view, and table format.
Ask yourself: Do the donor pages make sense as link sources for the acceptors? The key question is: Would a real user click this link?
If not, go to steps 6-7 and fine-tune the matching fields and AI distance.
Final steps
Once you’ve configured and fine-tuned the formula, your internal linking schema is ready for production.
You can download the results as a CSV file or publish them directly via the API.
Remember, internal linking is an ongoing, iterative process. After deploying the schema, wait a few weeks to observe changes in crawl budget and indexation. If the results are positive, consider generating additional schemas for other categories or sections of your site.
- Category:
- How to guides
- Internal linker
About Serge Bezborodov
Serge is the co-founder and CTO of JetOctopus, a tech SEO expert and log-file analysis enthusiast with over a decade of programming experience. A passionate advocate for data-driven SEO, he regularly shares insights from billions of crawled pages and analyzed log lines, helping SEOs turn complex data into actionable strategies.You can find Serge on Twitter and LinkedIn.