
How to set up real-time SEO alerts for JavaScript websites
In this article, we will discuss how to set up specific alerts for a JavaScript-based website. It is crucial to monitor the performance and address technical issues related to JavaScript, as any problems with its execution can prevent search engines from accessing the website’s content.
Why is configuring JavaScript alerts important?
Configuring JavaScript alerts allows you to receive timely information about any malfunctions on your website. By using alerts, you can promptly identify technical issues that may impact the indexing and crawling of your web pages by search bots. Additionally, alerts enable you to monitor the outcomes of website releases and updates, ensuring that everything functions smoothly and that your SEO settings remain intact.
- Ensure search engine accessibility: monitoring JS execution helps ensure that search engines can access and index correctly the content on your website. If there are issues with JS execution, search engines may not be able to properly crawl and index your pages.
- Timely detection of technical issues: by configuring JS alerts, you can promptly identify any technical issues on your website. Alerts notify you when something is not functioning correctly, allowing you to address the problem quickly and prevent potential negative impacts on the website’s performance.
- Monitor performance: monitoring JS performance helps you track the load time of your website. Slow-loading JS pages can negatively affect the user experience and lead to lower conversion rates. By setting up alerts for increased JS loading time, you can identify performance issues and take necessary optimization steps because slow load time can negatively affect the rendering budget.
- Track availability of JS resources: setting up alerts for unavailable or changing JS resources helps you ensure that all necessary resources are accessible to search engines and that search engines can render the page correctly. If there are any issues with JS resources, such as decreases or increases in their number, alerts will notify you so that you can investigate and resolve the problem.
- Detect changes in JS-rendered content: configuring alerts for JS content changes allows you to track any modifications in indexing rules, titles, meta descriptions, and other important elements that are affected by JS rendering. This helps you ensure that search bots receive the correct and updated content after JS execution.
With the help of JetOctopus, you can establish numerous effective and informative alerts tailored specifically for your JavaScript website.
General JS alert settings
To set up JavaScript alerts for a website, follow these steps.
Start by setting up a scheduled crawl with JavaScript execution. Navigate to the alerts section and select “Crawl alerts”.
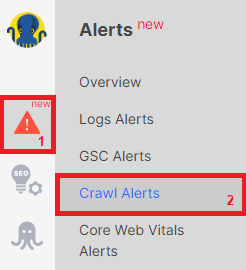
Next, click the “+Create a crawl schedule” button.

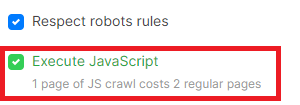
A window with crawl settings will appear. Configure all the necessary settings and make sure to activate the “Execute JavaScript” checkbox.
Once you have set up the scheduled crawl, return to the “Crawl Alerts” section and begin setting up alerts specifically for your website. You can create as many alerts as you need since JetOctopus does not impose a limit on the number of alerts.
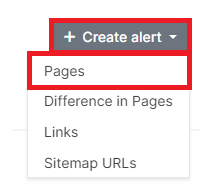
For JS alert settings, you can choose any of the data tables: “Pages”, “Difference in Pages”, “Links”, “Sitemap URLs”. However, most specific alerts for JS can be created based on the “Pages” data table.
Please note that while you can configure alerts for any JavaScript website, this article focuses specifically on JS alerts.
Alert structure
To facilitate working with alerts, let’s briefly review their structure. Setting up each alert involves three steps.
Step 1: Configure conditions – in this step, you can specify what needs to be checked. For instance, you can choose the types of pages to monitor, specific elements on those pages, technical specifications, and more.
Step 2: Alert configuration – here, you define the conditions that trigger the alert. If the conditions set in step two are met for the pages or issues configured in step one, you will receive an alert.
Step 3. Send alerts to – configure the email addresses of team members or developers responsible for monitoring JS performance. This ensures that they receive the alerts. You can also send alerts to a Slack channel or receive SMS notifications on your mobile device.
Now, let’s proceed with setting up alerts for your website’s JavaScript.
Increasing the load time of the JavaScript website
Load time is a crucial metric that significantly impacts your website’s performance. Let’s delve deeper into how load time can affect your site. Firstly, a prolonged load time can have a negative effect on the rendering budget. It’s important to consider both the crawl budget and rendering budget. Google takes into account the time spent scanning and processing your website, as well as the size of downloaded resources, in addition to the number of pages it can scan. When a JS page takes longer to load, it restricts the number of pages the bot can scan in total. Additionally, the load time of JS pages directly affects the user experience. Slower loading JavaScript pages result in fewer conversions. That’s why we have included an alert for tracking load time in the built-in alerts for JavaScript websites.
The standard alert triggers when there is an increase in JS loading time by more than 50%. However, you can customize it to suit your specific requirements. For example, in the configuration settings, you can choose the type of pages for which you want to monitor the load time.
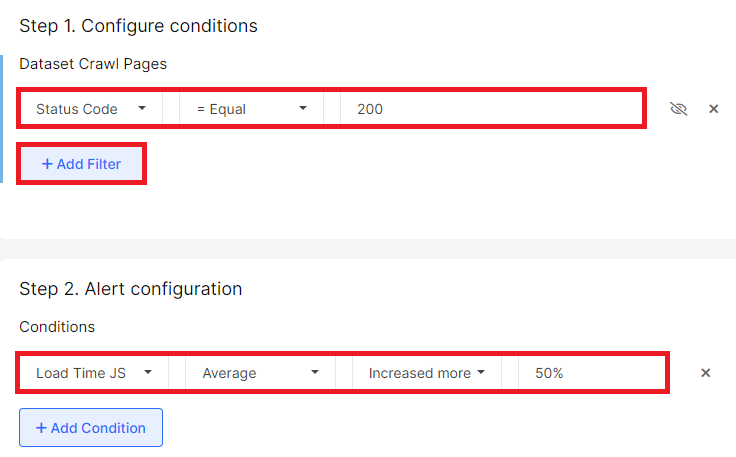
Furthermore, in the alert configuration, you can specify the threshold at which you wish to receive an alert for load time increase. By default, an alert is triggered if the load time increases by 50% compared to the previous crawl. However, you can also set absolute values, such as 4 seconds, which would be critical for the website’s JavaScript.

Other alerts for tracking JavaScript performance
Apart from monitoring load time, you can also set up alerts to stay informed about the availability and changes in JS resources. These alerts are particularly useful for keeping track of resource availability and managing any fluctuations in their numbers.

To learn more about JS resources and their significance, refer to the article: How to analyze JavaScript requests.
The number of JS redirects has increased
Another important alert to set up is tracking JavaScript redirects. To understand what JS redirects are and why it’s crucial to monitor them, please refer to the article. Now, let’s walk you through the process of configuring JS redirect tracking.
Step 1: Configure conditions – select “Status code” – “=Equals” – “399”.
Step 2: Alert configuration – here, you need to set up the condition specific to your website. For example, if you have 100 verified JS redirects, you can choose an absolute value of 100 as the threshold. Any value higher than that would be considered an error.
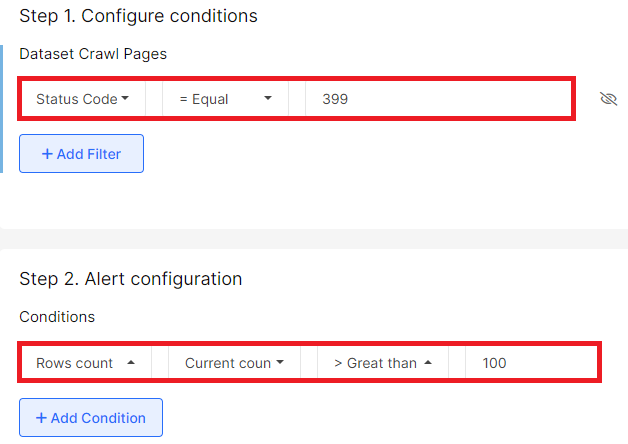
Additionally, you can configure an alert to trigger when the number of JS alerts increases by more than 10%.

JS content difference
This is a crucial set of alerts that should be configured by all users employing JavaScript technology on their websites.
To set up these alerts, use the “Pages” datatable and configure alerts for changes in indexing rules, titles, meta descriptions, and other aspects resulting from JS rendering.
What does this mean? It often happens that the web server initially provides default indexing rules, titles, and meta descriptions to bots. However, after executing the JS, the page receives correct indexing rules, a unique title, and meta description. Search bots, however, always enforce more restrictive rules. Therefore, monitoring such cases is essential.
To configure this alert, select the “JS Content Changes” block in the conditions and choose the desired item to track. For example, select “Meta Indexation changed” – “Yes”.
Next, in the alert configuration, choose “Rows count” – “Current count” – “More than” – “0”.
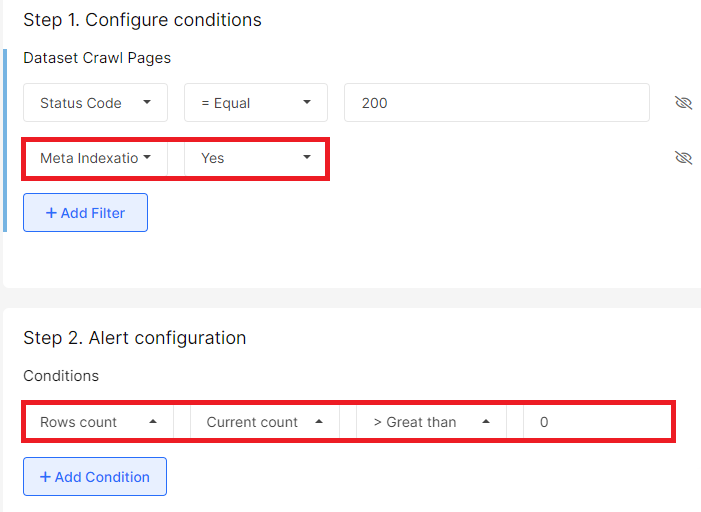
In this case, you will receive an alert if at least one page has different indexing rules in the HTML code received from the web server compared to after JavaScript execution.
Conclusion
Configuring JavaScript alerts is crucial for monitoring and addressing technical issues that may hinder search engine accessibility and indexing of a website’s content. These alerts provide timely information about malfunctions, allowing prompt resolution to prevent negative impacts on performance. By tracking JS execution, load time, availability of resources, and changes in JS-rendered content, website owners can optimize their JavaScript websites for better search engine visibility. Setting up alerts through platforms like JetOctopus enables customized and effective monitoring tailored to specific JavaScript websites.


