
How to use JetOctopus to monitor a website migration
Website migration is a long process that consists of many steps. During each stage, it is important to monitor the performance of the website. In this article, we will explain what types of monitoring are required during migration and how to set them up with JetOctopus.
In previous articles, we already talked about how to audit a website before migration and how to check redirects during migration. We hope that the article on monitoring will help you go through another step of website migration without any problems.
Introduction
Website migration monitoring includes the following points:
- old website monitoring and data collection;
- monitoring of two versions of the site during split testing for users and search engines;
- monitoring the new website and comparing the indicators with the indicators of the old one.
The bigger the website, the more data you need to monitor. It can be difficult in terms of finding convenient tools that allow you to collect all the data in one place. Looking ahead, the metrics to monitor for websites of all sizes are the same.
But using JetOctopus, you can track data from multiple sources at the same time. You will not need to switch between Google Search Console, services for collecting logs, etc. And due to the integration with DataStudio, you can make incredible reports using such additional sources as Google Analytics, sales data, etc.
Why so much monitoring?
Properly configured monitoring will help you avoid traffic loss. With daily analysis of the situation, you will be able to notice a negative trend in time and correct the error before you have problems with indexing or ranking.
For example, if there is a negative trend in the crawling of a new website by search engines, you will notice this in your reports in the “Logs” section. And you can quickly fix the bug so that the pages do not drop out of the index.
What is the most important thing to monitor during migration?
The correct answer is everything. And if in detail, then you need to follow the following points:
- frequency of scanning of your website by various search bots;
- the ratio of scanning by different types of bots (mobile, desktop and with different versions of browsers – yes, it matters);
- number of indexed pages;
- dynamics of re-indexing of new URLs;
- lost and new pages in SERP;
- new and lost keywords;
- pages positions in search results;
- website performance;
- code status and correctness of redirects;
- clicks, impressions, CTR;
- bounce rate;
- conversion rate.
Of course, you also need to regularly start crawling, which we have already written about before. In addition, you can set up monitoring, which will help monitor your main traffic. For example, monitoring for results from Google Discover or Google News.
Next, we will tell you what monitoring can be done using JetOctopus.
Monitoring the activity and behaviour of bots
Monitoring the activity and behaviour of bots includes monitoring the frequency of scanning the website, the number of scanned pages, the frequency of rescanning the entire website and monitoring the different types of search robots that visit your website.
Immediately after the migration, the scanning frequency may increase significantly if you have not blocked the entire website with the robots.txt file. Over time, the number of visits will stabilize and you will be able to clearly see the trend and compare the data with the previous website.
The first report we recommend using is “Dynamics of bots visits”. Here you’ll see how many pages different search engines have crawled (or how many visits they’ve made) during the time you’ve chosen.

This is just general data, but by analyzing this chart, you will be able to find a problem early out with different search engines. For example, if you get traffic from Google and Bing, you will see if the number of visits of one of these bots decreases.
Monitoring status codes
During migration, it is important to monitor the dynamics of the code status. Pay attention to whether the number of 404 pages has increased, whether there are 5xx and 3xx pages.
There are two ways of tracking such pages. The first one is a scheduled crawl. If it is too expensive to run a crawl so often, you can set up a crawl of the most important pages of the website. More information:
Information about all status codes will be displayed in the “Technical” – “Statuses” report.
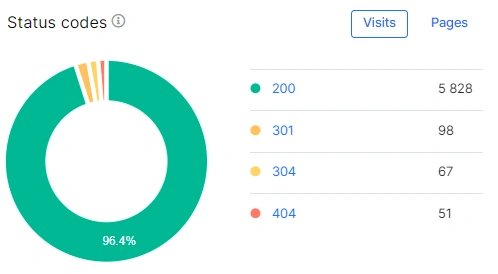
Click on the status code to go to the data table with the required information.
The second way is to monitor the status of codes for search robots. It is quite normal if there will be a lot of 301 pages the first time: if you changed the website address and set up redirects, search engines will scan the old URLs for a few more months to make sure that the redirects are not false. This information can be obtained in the menu “Logs” – “Bot dynamics”. Set the desired period and select the desired robot.

Both checks should be done regularly to avoid a sudden drop in traffic.
Page load time
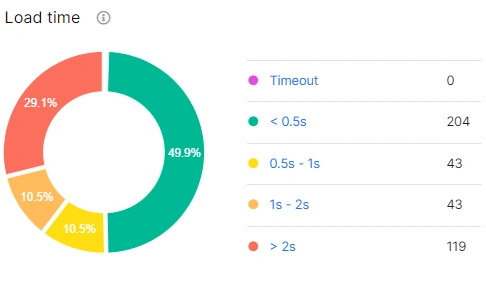
Another important metric. Page loading time should not exceed 2 seconds. We would say that 2 seconds is already a crucial indicator.
This data is available in both the “Crawl” and the “Logs” menu. The first data shows the loading time for scanned pages, the second one is the load time during search robots visits.
Core Web Vitals metrics
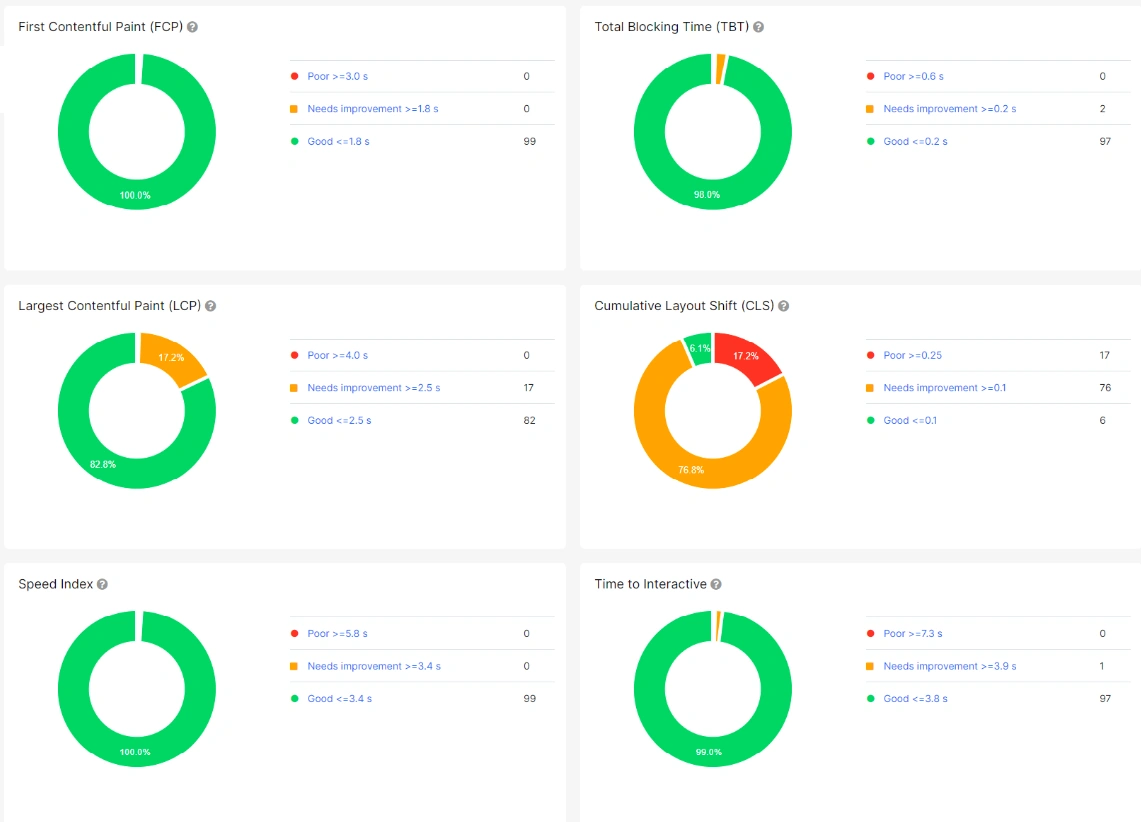
Page speed is one of the most important ranking factors. We previously wrote about how to check these metrics with JetOctopus.
We recommend that you pay special attention to Core Web Vitals during website migration. After all, the transition from the yellow to the green zone can instantly bring good results. Conversely, degrading these metrics during migration will reduce your organic traffic.
Effectiveness of pages in SERP
Check whether the pages of the new version of the website are already showing in SERP. For this, you can use the “New Pages” report in the “Google Search Console” section.
More information: How to find the newest pages in SERP.
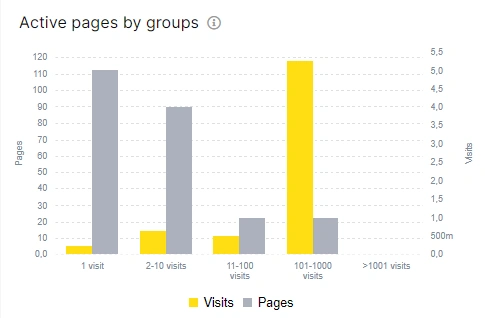
You also need to monitor clicks, impressions and the average position of the page in search results.
We recommend that you pay attention to the “Insights” report to understand the strengths of the new version of the website and find those cases that need improvement.
Lifehacks that will help you easily go through the website migration
What is most important in monitoring during website migration? Monitoring should show potential problems in time. As soon as a negative trend begins in at least one indicator, you should find out about it first. Therefore, we recommend setting up various alerts.
More information: Guide to creating alerts: tips that will help not miss any error.
Another lifehack is to use comparison of crawls. Compare the crawl results of the old website and the new one. Pay attention to such indicators as the number of crawled pages, the number of indexable pages, the structure of internal links, etc.

