
How to configure a crawl of your website
Before you start a new crawl we recommend preparing basic information about your website. It allows you to set up the optimal configuration of the crawl. Of course, the basic settings of JetOctopus crawl are suitable for most websites, but it is worth delving into the settings to get the most useful information about your site.
Basic settings
Before starting a new crawl you need to make basic settings. Select a project or create a new one and enter the URL of your website.
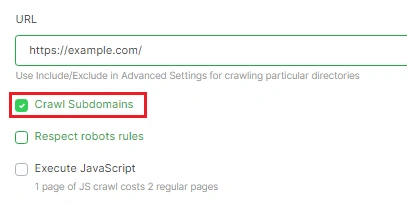
Note that the URL must be entered with the domain and HTTP/HTTPS protocol. So make sure which URL is the main one for your website: with HTTP or HTTPS protocol, with www or without, etc. Also, find out if there are subdomains on your site: according to the default settings, JetOctopus does not crawl subdomains.

To crawl subdomains, activate the “Crawl Subdomains” checkbox. If you’re not sure if there are subdomains on your website, you can also activate this checkbox to check.
JetOctopus will only process subdomains of your website. This means you will see URLs like example.com, new.example.com, m.example.com, etc. in the crawl results. But the results will not include external subdomains, such as m.example-admin.com and example.en. They are separate domains.
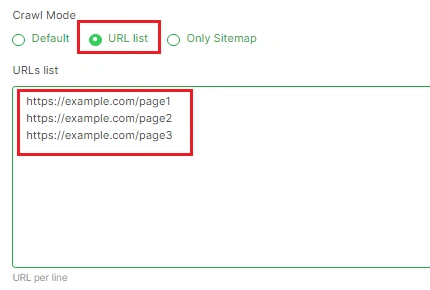
Crawl Mode is a great option that allows you to select the scan mode. By default, JetOctopus will search for all URLs in the code of your website and will scan them. But if you need to scan only specific URLs, use the “URL list” mode. Enter each URL in a new line. You don’t need to add extra characters between lines, such as commas, and so on.
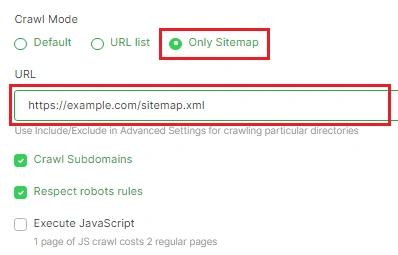
You can also crawl a separate sitemap. Of course, JetOctopus supports the crawling of sitemap index files. If you enter a URL of a sitemap index file, JetOctopus will crawl the URLs from all sitemaps in that index file.
Use “Only Sitemap” crawl mode to process your sitemaps. If you need to add a few sitemaps, use “Advanced settings” and add the list of sitemaps in the appropriate field.
Later I will tell you how to use several sources of URLs for crawling.
What do the other items in the basic settings mean?
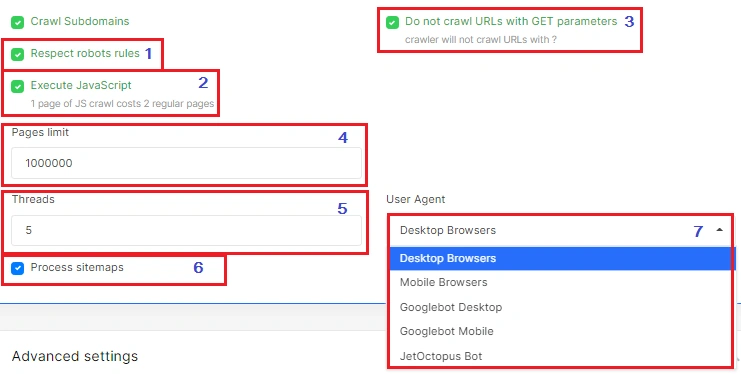
- Respect robots rules – our crawler will follow the rules for search engines, including the directives in the robots.txt file, meta-robots, and x-robots tag. If there are “noindex, nofollow” on the page, our crawler will take into account these robots meta and will not process them.
- Execute JavaScript – If your website uses JavaScript and you want to analyze what data search engines receive after processing JavaScript, activate this checkbox. Pay attention to the limits of your crawling: 1 page of JS crawl costs 2 regular pages.
- Do not crawl URLs with GET parameters – a useful setting for many websites. Most URLs with GET parameters are not indexing, so you can save your limits. Activate this checkbox if you are sure that URLs with GET parameters are not indexing.
- Pages limit indicates the number of pages JetOctopus will scan. As soon as JetOctopus reaches this number, the crawl will end. We recommend crawling the entire website. Don’t use this option to crawl only certain pages. Use for this crawl mode “URL list” or add “Deny Pattern” in “Advanced settings”.
- Threads – If you need to get results faster and you are confident in your hosting, add more threads. Pay attention to the fact that JavaScript crawling will take longer. You can also start crawling when your site will have not many visitors. For example, at night or early in the morning.
- Process sitemaps – if this checkbox is activated, JetOctopus will find your sitemap (for example, in robots.txt or on the page like https://example.com/sitemap.xml) and also scan URLs from the sitemap.
- You can also select a user agent for crawling. You can compare what the Googlebot Mobile and the Googlebot Desktop see, or compare a regular browser and a Googlebot crawling results. The first comparison will show whether you are ready for mobile-first indexing and whether all the information is available to mobile bots. The second comparison will show the difference between what is available to search engines and what is available to users. If the difference is large, your site may get Google penalties.
Advanced settings
If you want JetOctopus to crawl rel = “nofollow” or <meta name = “robots” content = “noindex, follow” /> pages, activate the appropriate checkboxes. Usually, search engines do not follow such URLs, so you need to check whether these URLs really should not be indexed by search engines. There are cases when due to the error rel = “nofollow” is where it should not be. The same with the pages that contain the meta robots “noindex, follow”.

As you may remember, for websites with separate subdomains for the mobile version, it is necessary to use rel = “canonical” and rel = “alternate” for both (mobile/desktop) versions of the website. Therefore, activate this checkbox if you need to verify that these tags are correct.

By default, JetOctopus does not process image information on your website. Therefore, if you want to analyze images, find missing alt attributes, etc., activate the “Process images data” checkbox.

Include/Exclude URLs
Very important functionality. If you need to scan only certain URLs (or, conversely, do not scan some URLs), use these options.
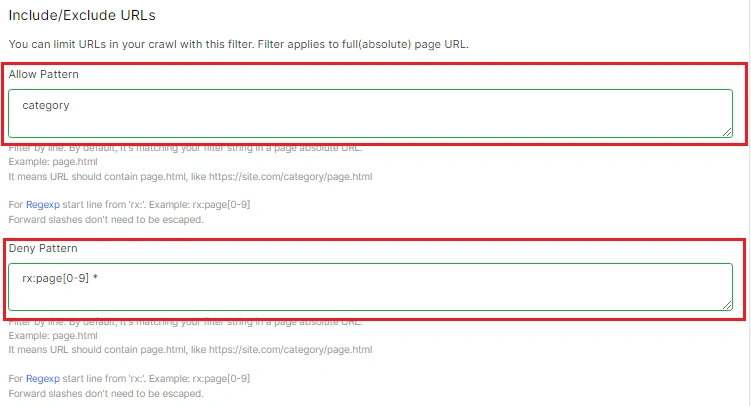
“Allow Pattern” and “Deny Pattern” maintain the same rules. If you want to scan URLs that contain special characters/ URL paths, just enter them in. For example, if you need to scan all URLs that contain /category/, just enter it in the field “Allow Pattern”. In the crawl results, you will find only URLs such as https://example/category/1, https://example/category/abc, etc.
You can also use regex. This is useful if your website has a clear and understandable structure. To use regex, start the line with rx:. And write the regex rule. For example, rx:page[0-9] *. This means that JetOctopus will scan all URLs that contain the URL with “page” and numbers after.
The exclusion of URLs works similarly.
Add custom robots.txt if you are testing fully blocked by robots.txt site or want to test how changes to the robots.txt file will affect the crawling budget of your website. If you enter robots.txt here, JetOctopus will ignore the directives of the robots.txt file in the root directory of your website.

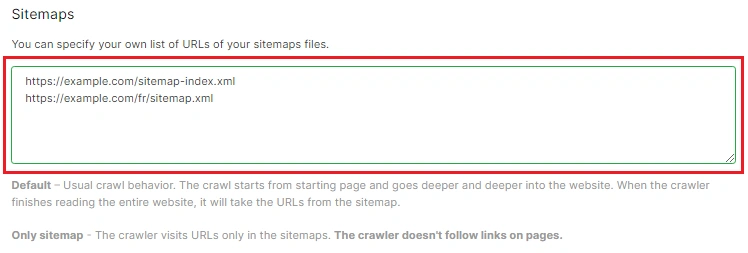
Below you can add a list of sitemaps that you need to process. This is an additional source of pages for JetOctopus if crawl mode “Default” is selected. If you have selected Sitemaps mode, JetOctopus will only scan URLs only from the sitemaps you enter here.
Add sitemap index files if you have. Use URLs of sitemaps with HTTPS protocol and domain.
HTTP Auth – add a user and password if you want to crawl a staging website or if your site needs authentication. You can also save the cookies (in the default settings, our crawler does not save the cookies) or add custom request headers to get a server response for a specific client.

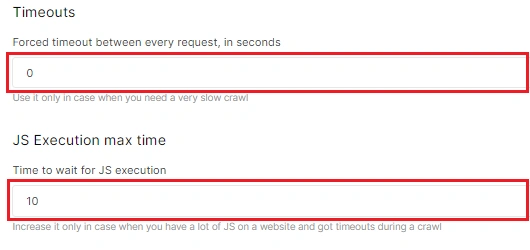
If you crawl a JavaScript website, use the JS settings: “JS Execution max time”, “JS Execution render viewport size” and “JS End Render Event”.
You can also configure the crawler’s location. This is necessary to check how your website is viewed by users from different countries. For example, if you have a multilingual website and you redirect users to different language versions depending on the visitor’s country, you can check what visitors from different countries will see exactly.

We also have great options for adding pages from the Google Search Console as an additional source of URLs. And of course, you can use a custom extraction.
Read more: How to connect Google Search Console with JetOctopus.
Here you can change the title of your crawl. If you want to save these settings to use them for next crawls, activate the checkbox “Save as project defaults”. When you have made all the settings, click “Start crawl”.

FAQ about crawl settings
How do I add URL sources for crawling?
By default, JetOctopus crawls only those URLs that it finds in the code, or URLs from the list (when using the crawl mode “URL List”). But you can add an additional source of URLs that our spider should scan. With a complete crawl, you can get all the information about your website and improve it for the convenience of users and search engines.
- Activate the “Process sitemaps” checkbox in the “Basic settings” block.
- Add a list of sitemaps in the appropriate field.
- Allow scanning subdomains. To do this, activate the “Crawl Subdomains” checkbox.
- Allow nofollow and noindex URLs to be scanned, and disable the “Respect robots rules” checkbox if you need to find all URLs on your website.
- Set the maximum page limit.
- Add Google Search Console, and JetOctopus will crawl URLs found there.
How to set up an additional delay between requests?
If there is a risk that your server will not withstand the load, we recommend reducing the number of threads or crawling the site at a time when you have a small number of visitors.
If your site responds slowly, set a timeout in the “Advanced settings” block. We will wait for the number of seconds you specify before the next request.
How to crawl subdomains?
You can set up a separate crawl for each subdomain. To do this, set up a new crawl, and enter the subdomain URL in the URL field. You can also crawl subdomains along with the main domain. To do this, activate the “Crawl Subdomains” checkbox.

How to scan URLs from sitemaps?
If you want to scan the URLs you send in the sitemaps only, select the crawl mode “Only Sitemap”. You can add sitemap index files or add multiple sitemaps (or multiple sitemap index files) in the “Sitemaps” field in “Advanced settings”.

How to crawl only part of the website?
We recommend using a full crawl. But if you want to scan only part of the website, you can use the following tips.
1) Limit the number of pages that our spider will scan in the “Pages limit” field. Then crawling will stop as soon as JetOctopus scans the number of pages you specified.
2) Use the URL pattern that JetOctopus should scan. You can use both URL paths and regex. We will scan only URLs that match the condition in the “Allow Pattern” field.
3) Disable scanning of certain URLs. If you know exactly which URLs you don’t need, you can add their URL paths (or use a regex) in the “Deny Pattern” field. Then JetOctopus will avoid these pages during crawling. And you can keep your limits.
4) Make a custom robots.txt file, which prohibits scanning of pages you do not need. Add custom robots.txt in the appropriate field when setting up crawl. You don’t need to change robots.txt on your website.
How don’t crawl certain pages?
1)Use the “Deny Pattern” option. Add URL paths or use regex.
2) Create a custom robots.txt file.
How to crawl only certain URLs?
JetOctopus has a “URL List” scan mode. Use this scan mode and add the URLs you want to scan to this field. Enter each URL from a new line, don’t use commas between lines.

You can also scan URLs that contain certain URL paths or match the regex rule. To do this, use the “Allow Pattern” option in the “Advanced settings”. The crawl mode should then be “Default”.


