How to see how Googlebot renders JavaScript website
If you use dynamic or client-side rendering, make sure Googlebot sees the correct HTML and content. With dynamic rendering, pre-rendering applies only to search engines and Googlebots, not to all clients. There are also cases where the web page version for Googlebot is slightly different from the user version. For example, you can show users a block with delivery information based on geolocation and browser data. Also, many websites use personalized recommendations based on the products viewed. However, Google does not send such data to the website, so these blocks may not be displayed during Googlebot visits.
In this article, we’ll show you how to see how Googlebot renders your website. By analyzing this information, you’ll be able to understand why Googlebot does not visit some pages, why certain pages are not ranking for relevant keywords, and uncover other technical issues related to dynamic websites.
In what cases should you pay special attention to this?
Run a Googlebot check if any of the following applies to your site:
- Your site uses JavaScript rendering: Googlebot may render JS differently from a regular browser
- You use country-specific redirects or geolocation: verify that Googlebot can reach all versions of your site
- You’re running a split test or rolling out new features: confirm what HTML Googlebot actually sees
- You’re migrating, redesigning, or changing site architecture: run checks before, during, and after
- A page has dropped out of the index or isn’t getting crawled — check what Googlebot sees when it visits that URL
- You’re doing a technical SEO audit — Googlebot rendering checks should be part of every audit
1. If you have country-specific settings for users
For example, you have a website at https://example.com.de and another at https://example.com. Based on your web server settings, you redirect users with German IP addresses to https://example.com.de, even when they try to access the international version (https://example.com). In that case, you need to check which version Googlebot sees and whether all domains/subdomains/subfolders are available to it.
2. If your website uses JavaScript
Sometimes, search engines process JavaScript differently from browsers, so it is important to understand which JavaScript the bot can and cannot render.
3. During split testing/testing of new features
If you are testing new features (for example, a new tool for managing indexing rules), be sure to check what the GoogleBot detects and which HTML elements are displayed on the page when Googlebot scans the URL.
4. When preparing for migration
Using JetOctopus, you can test how Googlebot renders the new page version even on a staging website. Before, during, and after all migrations, it’s important to run this check on different page types.
5. When changing a website design, site architecture, etc.
6. During a technical audit, when looking for problems with indexing or crawling by search engine crawlers
If a page has not been indexed for a long time, has dropped out of the index, or has not been visited by search engines in a while, check how it appears to Googlebot.
These checks should be carried out regularly, not just when troubleshooting specific issues.
Once you’ve decided to run a Googlebot scan of your site, knowing what to look for is as important as knowing how to do it. Key things to investigate include whether navigation is consistent between user and bot views, whether critical content is visible to the crawler, and whether server responses match across both experiences.
Googlebot test with Google Search Console
The easiest way to see how Googlebot renders pages is to run a test in the Google Search Console or use Mobile Friendly test. Test the URL in real time and check the page code and snapshot.

Lifehack: copy the HTML code returned by Google and paste that code into the HTML code of the empty page in your browser using developer mode. So you will be able to see a complete snapshot of the page “through the eyes of Googlebot”.
However, this method has several disadvantages.
- The number of checks per day is limited in Google Search Console.
- You cannot check a large number of URLs in bulk.
- You cannot choose which Googlebot rendering data to show. The Mobile-Friendly Test shows only the rendered code of the mobile bot, as does Google Search Console in most cases.
If elements are missing from the rendered screenshot, check the ‘MORE INFO’ tab next to ‘SCREENSHOT’ to identify which resources are blocked from Googlebot. You can perform a bulk check of pages’ indexing statuses in Google using the URL Inspection Tool.
Simulate Googlebot with Chrome DevTools
You can also check how Googlebot renders your website pages using Chrome DevTools.
- Select a user agent from the list of official Googlebot user agents: choose a mobile or desktop bot, the required browser version, etc.
- Open Chrome Dev Tools (Command+Option+C (Mac), F12 or Control+Shift+C (Windows, Linux and other operating systems).
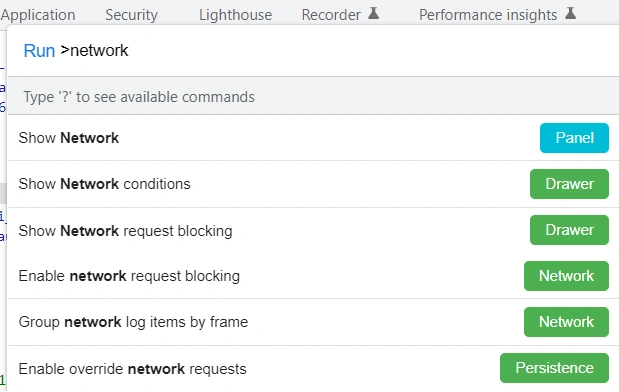
- Start the command line by clicking Control+Shift+P.
- Select “Show Network conditions”, then press “Enter”. The “Network conditions” tab will open.
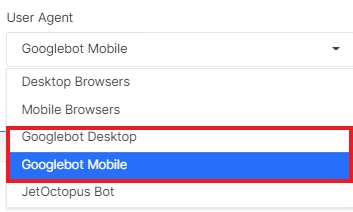
- Deactivate the “Use browser default” checkbox, select “Googlebot” and enter the required user agent data.
- Reload the page.
This allows you to simulate Googlebot behavior and see exactly what the bot encounters. The advantage of this method is that you can configure any user agent and check how a specific Googlebot version renders JavaScript. But like Google Search Console, you won’t be able to check URLs in bulk.
If your site uses geolocation-based redirects or blocks traffic from certain regions, keep in mind that Googlebot primarily crawls from US IP addresses. To accurately simulate Googlebot during manual testing, consider routing your traffic through a US-based VPN.
There are also other third-party tools you can use to simulate Googlebot, including Screaming Frog, To The Web’s Googlebot Crawling Simulator, and Dentsu’s Fetch & Render tool. Each has its own trade-offs: for example, these tools are limited to checking one or a handful of URLs at a time. JetOctopus allows you to test Googlebot rendering at scale across your entire site.
Bulk inspection with JetOctopus
Another way to test Googlebot rendering on your website is to use JetOctopus. We offer two options: bulk inspection across your entire site, and checking the JavaScript-rendered version of any individual URL from your crawls or logs.
Bulk inspection
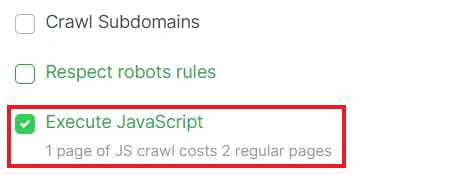
- Start the crawl and select Googlebot Smartphone or Googlebot Desktop in the list of user agents.
- Activate the “Execute JavaScript” checkbox.
More information about setting crawls: How to configure crawl for JavaScript websites. - Wait for the crawl to finish and analyze the results. All reports, including JavaScript rendering issues, will be displayed on your dashboards.
The advantage of this method is that you get a full picture of your website. You can see which pages are indexable, which meta-tags Googlebot crawls and which URLs are not available to this user agent. In addition, you can quickly spot differences between the mobile and desktop versions. You can also run a JavaScript crawl using the Googlebot user agent to see how Googlebot renders your website. You don’t need to check each page individually.
The disadvantage is that you won’t have access to the raw code that Googlebot sees. In addition, if your web server uses reverse DNS lookup to verify the bot’s authenticity, the crawl results may not match what Googlebot actually sees.
We recommend carefully comparing HTML and JavaScript, as well as performing all other checks. Here is a list of recommendations: How to check JS website with JetOctopus.
View page as Googlebot in one click
To do this, go to any data table: Logs, Google Search Console, or crawl results. Select the desired URL and click the three-line (menu) icon.

From the dropdown menu, select “View as Googlebot” or “View as Googlebot with JS”. This is the fastest way to get a Googlebot view of any indexed or crawled page.

The version of the page that Googlebot sees will open in a new browser tab. To see the HTML, use Chrome DevTools.
The advantage of this method is that you can explore what code Googlebot has rendered for a specific page.
Keep in mind that your website may be crawled by different types of Googlebots, each running a different browser version. When you check how Googlebot sees your page, JetOctopus emulates the bot’s behavior using the most common browser version.
If your website uses reverse DNS lookup or has security systems, such as Cloudflare, additional settings may be required on the server side or in CloudFlare.
Comparison of JS and non-JS content
You can also compare the JS and non-JS versions of any page by performing a check using the Googlebot Desktop or Googlebot Mobile user agent.
To do this, go to the “Tools” menu.
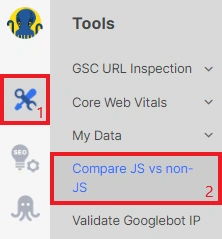
Next, enter the URL, select the desired user agent and click the “Load” button.

In the results, you will see the difference between the code that Googlebot receives from your server and the code that Googlebot views after rendering.

More information about comparison of JS and non-JS Tool: Product Update. Compare JS vs non-JS content with JetOctopus.
If you are planning to migrate to JavaScript, we recommend watching the webinar: Webinar: How to Migrate a website to JavaScript. Best practices.
- Category:
- How to guides
- On-page Tech SEO
About Sofia
Technical SEO specialist. Sofia has almost 10 years of experience, of which the last 5 years in JavaScript SEO. She is convinced that SEO is a very technical part of digital marketing. And without logs and in-depth data analysis, you can't do effective SEO.