Why do you need a site migration checklist
Site migration is one of the highest-risk SEO operations.
A single mistake during migration can:
- wipe out years of organic traffic,
- break indexation across thousands of pages,
- silently waste crawl budget,
- and only become visible weeks after launch, when rankings are already gone.
If you’ve never done a site migration before, this checklist exists to answer one simple question:
What exactly do I need to do to migrate a site without losing traffic?
This is not an article and not theory.
This is a step-by-step checklist you can follow before, during and after a site migration.
What this checklist helps you avoid
Before migrations, most teams operate under two dangerous assumptions:
- “We’ll catch issues after launch”
→ By then, traffic is already lost. - “Search engines will figure it out”
→ Bots don’t fix broken canonicals, redirects, or rendering issues.
This checklist helps you:
- see what search bots actually crawl,
- validate critical elements before launch,
- detect issues early instead of reacting to damage,
- and keep traffic stable throughout the migration.
How to use this checklist
- Follow the steps in order
- Do not skip steps, even if they feel “minor”
- Use it as a validation framework, not just a to-do list
You don’t need prior migration experience – this checklist is designed to guide you through the process.
Now follow the checklist below step by step. Do not skip steps.
SITE MIGRATION CHECKLIST
Phase 1 – Pre-Migration Preparation
1. Define Migration Goals
- Improve UX, speed, scalability
- Increase conversions, reduce server load
- Align product roadmap with modern architecture
2. Select JavaScript Framework & Rendering Strategy
- Choose framework supported by search engines
- Decide between SSR, CSR, Dynamic Rendering
- Confirm long-term support of framework version
- Plan SSR architecture early (not after launch)
3. Prepare Staging Environment for SEO Testing
- Staging must be crawlable (password optional)
- SSR must be enabled
- DevTools tests for HTML, SSR, and JS versions
- Chrome DevTools / Postman testing with Googlebot user agent
Phase 2 – Prepare for Real Users (A/B Testing)
4. Launch A/B Test – Start With a Small Percentage
- Start with 1% of users (large sites) or 10% (small sites)
- Compare conversion rate
- Compare bounce rate
- Compare cart additions & checkout funnel
- Identify UI/UX bugs
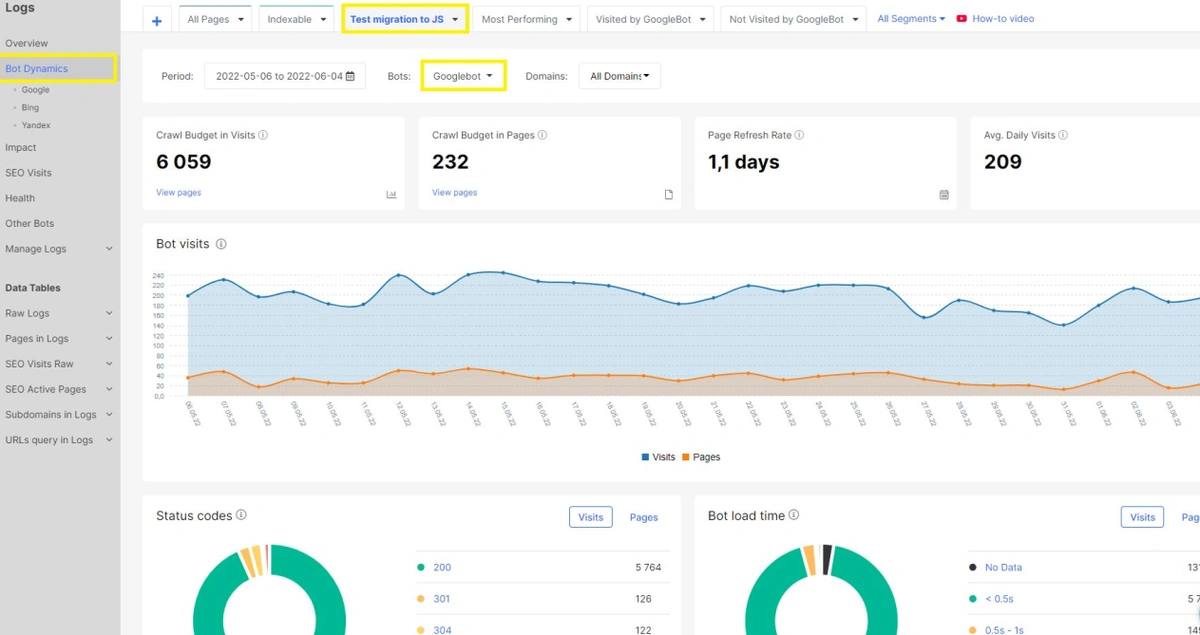
Monitor Googlebot Activity During A/B Testing
5. Fix All User-Facing Issues Before SEO Testing
- Cart issues
- Payment failures
- Slow SSRRendering glitches
- Lazy loading edge caseserstanding your real visibility across the entire search ecosystem.
6. Keep JavaScript Version Hidden From Search Engines (During A/B Tests)
This step applies ONLY during user A/B testing phase – before opening JS version to search engines
- Search engines (Googlebot, Bingbot, etc.) see only the old HTML version
- The JS version is shown only to real users participating in A/B tests
- Proxy / server rules detect bots by User-Agent and/or IP and always return the HTML version
- Checked in GSC Live Test and logs that Googlebot does not receive the JS version during A/B tests
Verify Googlebot Only Crawls the HTML Version During A/B Testing
Phase 3 – Prepare for Search Engines
7. Prepare a Test Pool of URLs
- Product pages
- Category pages
- Filter pages
- Blog/articles
- Static content pages
Rules:
- Choose URLs frequently crawled by Google
- Do NOT choose top-traffic URLs
- Create segments based on page templates
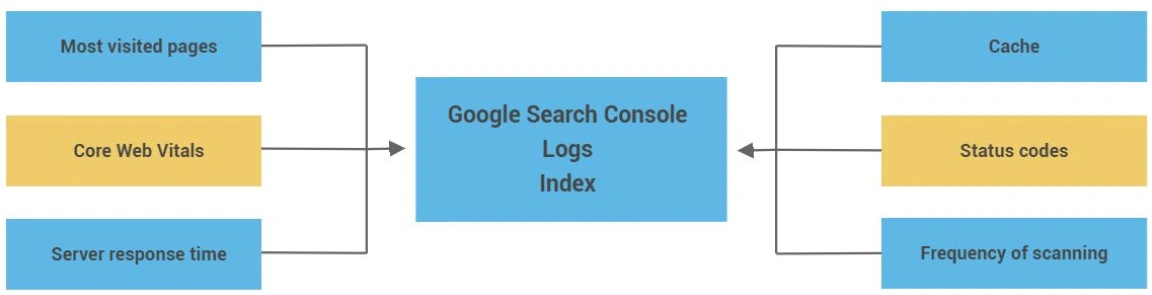
8. Collect Baseline Data (Before Migration)
Collect Baseline Performance & Crawl Data Before Migration

Collect at least 4–12 weeks of data:
- Positions
- Clicks
- Impressions
- CTR of ranking keywords per URL
- Organic conversions
- Crawl frequency
- Status codes
- Server load
- Core Web Vitals
- Logs (bot activity patterns)
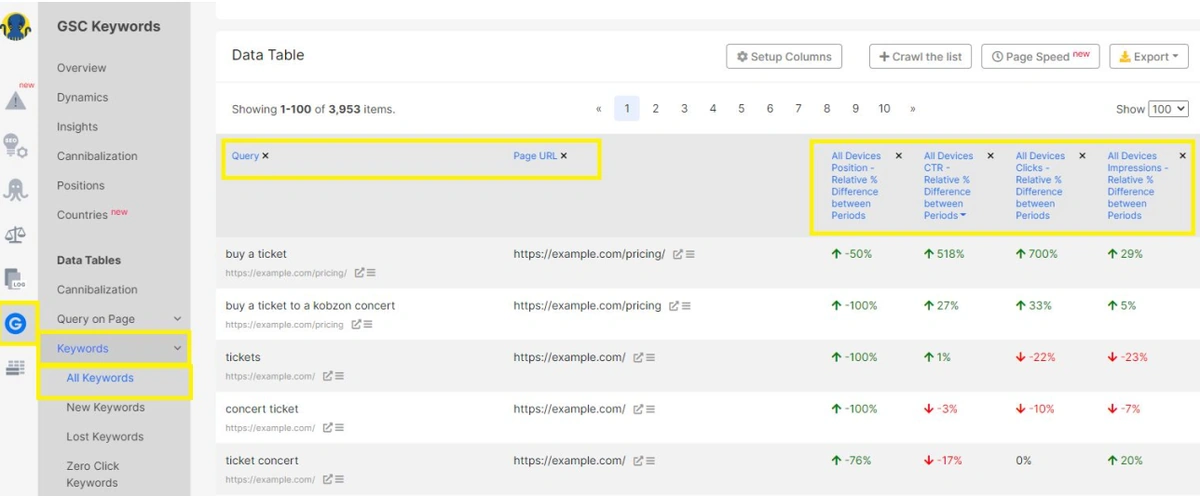
Collect Baseline Keyword Rankings & CTR Data (GSC Keywords Report)
9. Create Monitoring Dashboards
- Use tools (e.g., JetOctopus, GSC, GA4):
- HTML vs JS comparison dashboard
- Rendering performance dashboard
- SSR availability alerts
- Log anomalies
- Indexation changes
- Content changes (titles/meta/H1)
Phase 4 – Enable JavaScript for Search Engines (Limited Test)
10. Allow Googlebot to Access Only Test URLs
- Open a small test set
- Block all other URLs
- Maintain strict proxy settings
11. Monitor Rendering & Indexing
Check:
- SSR HTML vs rendered DOM
- Canonicals
- Meta robots tags
- Hreflang
- Structured data
- Internal links
- Missing content
- JS errors
- Added/removed text
- Page size changes
- Load time after JS execution
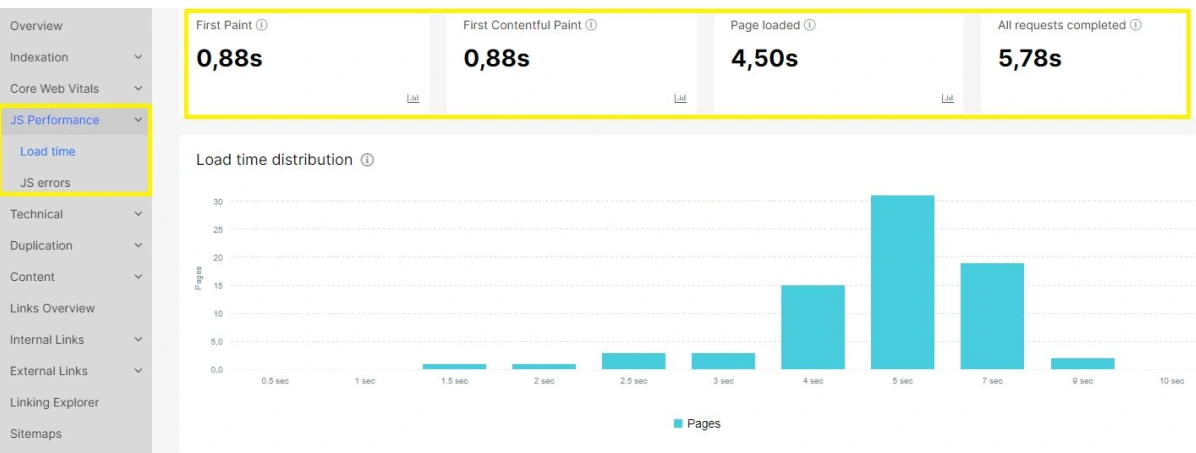
Monitor JavaScript Page Load Time & Core Performance Metrics
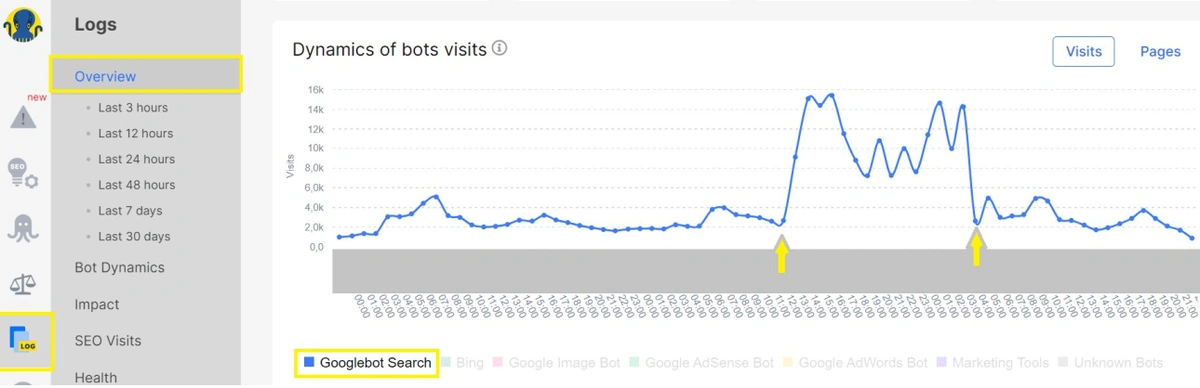
12. Monitor Bot Behavior
Use logs to verify:
- Crawl frequency spike is normal
- No server overload
- Status codes stable
- No redirect loops
- No blocked JS resources
13. Compare Before/After Performance
Check for each test page:
- Positions
- Clicks & impressions
- CTR
- Keywords count
- Rendering time
- Indexation status
Phase 5 – Full Migration Ready Checklist
Your site is ready ONLY if all points below are TRUE:
14. User Metrics
- No sharp drop in conversions compared to the HTML baseline
- No checkout or cart bugs
- Performance is stable
15. SEO Technical State
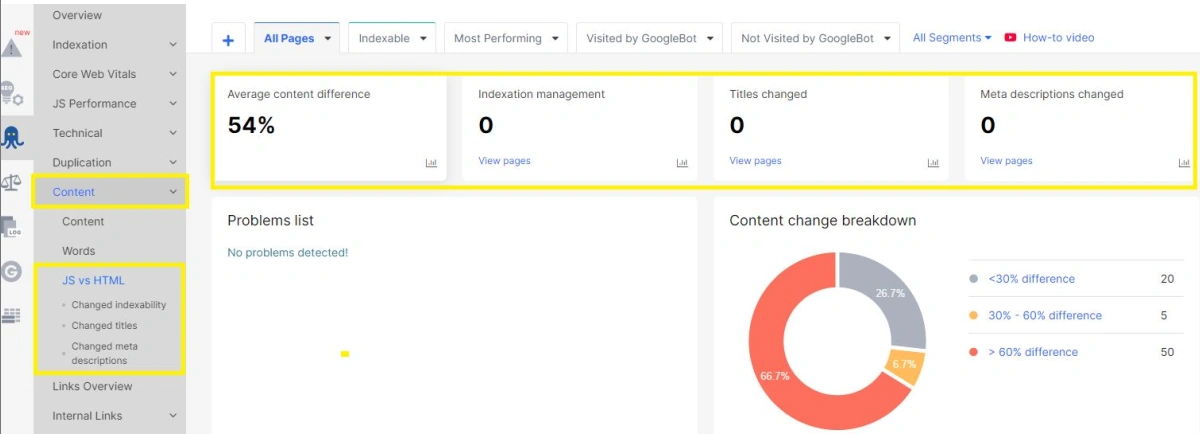
Compare HTML vs JavaScript Content & Metadata (SEO Audit)
- SSR works for every template
- Metadata is correct on both SSR & JS
- The following key elements are present and consistent in SSR HTML and rendered JS:
– <title>
– meta description
– meta robots
– canonical, hreflang (if used)
_ <h1>
– main content / key product information
– internal links (navigation, breadcrumbs, related items)
– structured data - Page returns the correct status code
- CWV are stable (especially LCP, INP and CLS)
16. Search Engine Test Results - Test pages did not lose rankings
- Indexation is correct
- Googlebot crawls efficiently
- Rendering is successful
- No major JS errors
- Logs show typical behavior
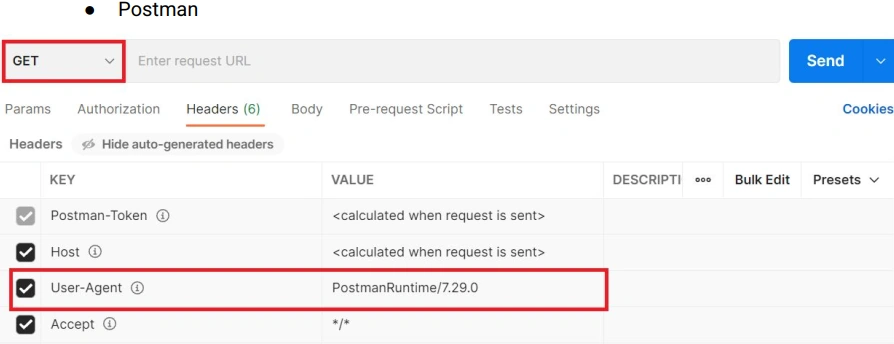
Test Bot Access with Postman (User-Agent Check)
If all checks are green → you’re ready!
Phase 6 – Controlled Full Migration
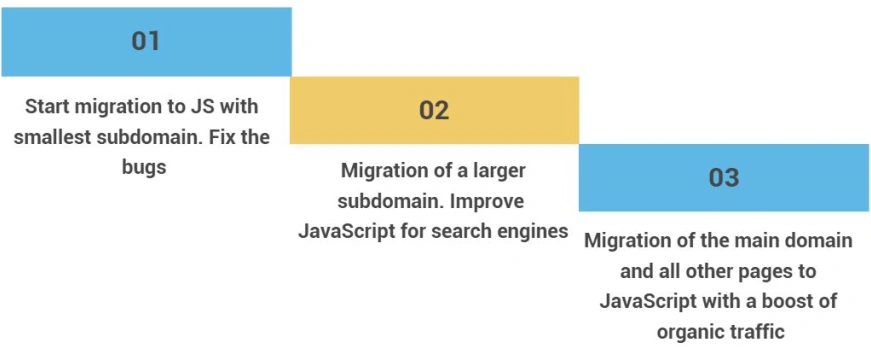
17. Migrate in Stages
Recommended order:
- 1st: low-traffic subdomain
- 2nd: medium-traffic sections
- 3rd: final migration of main domain
Staged JavaScript Migration Strategy
18. Continue Daily Monitoring
- SSR tests after each release
- Rendering tests
- GSC positions
- Logs anomalies
- Content changes
- Crawl frequency
- Indexation status
Key SEO & UX Metrics to Monitor by URL

19. Have a Rollback Plan
- Instant rollback to previous version
- Revert SSR or proxy rules
- Freeze deployments
- Alert devops + SEO team
Phase 7 – Post-Migration Stabilization
20. Weekly Audit
- Crawl entire site with JS enabled
- Compare HTML vs JS changes
- Identify missing elements
- Detect template issues
- Monitor indexing & rankings
Collect Baseline SEO Performance & Crawl Data
21. Monthly Audit
- Full performance analysis
- Log analysis
- GSC trends report
- Identify long-term JS errors
- Review Core Web Vitals
22. Continue Improving JS SEO
- Reduce JS execution time
- Optimize SSR
- Minify JS bundles
- Reduce unused JS
- Improve lazy loading
- Optimize content loading paths
Final Migration Readiness Checklist (SSR & SEO Validation)
🎉 Congratulations – You Are Ready to Migrate to JavaScript Safely
From checklist to confidence
This checklist helps you structure a safe site migration.
But confidence comes from validation – not assumptions.
If you’d like expert validation of your site migration plan or help reviewing critical steps from this checklist, book a migration consultation with our team.